Showing posts with label science. Show all posts

Monday, November 18, 2019

Marble Ramps in the Sand Table


I’m always looking for new ways for children to move sand and water in the sensory table. Most of the time, sensory table activities focus on the basic activities of scooping, filling, and pouring. As children get older, and gain more experience with these tasks, they become less interesting. You can only scoop and pour so many times before you’ve mastered it and are ready to move on to exploring and manipulating the materials in a different way. 

I’ve experimented with different ways of setting up “apparatus” (to borrow Tom Bedard’s phrase) in the sensory table, mostly by adding different levels, or tables, or other surfaces with holes. One of my colleagues introduced a set up that provided a new dimension to the children’s sand play. She put the “marble run” pieces in the sand table.


The children were instantly drawn to the familiar experience of building the marble run.
But they discovered that sand doesn’t move the same why that marbles do.


The sand didn’t flow quickly down the ramps. This led to figuring out ways to move the sand more quickly - by pushing with fingers or wiggling the whole tower to get the sand to flow down. Some of the children changed their focus to filling the structure, using scoops and funnels and seeing how much sand they could fill at a time.


They noticed the sand cascading over the top, and in some cases, pouring quietly out of small cracks where the pieces fit together. The focus shifted again to figuring out how to plug up those cracks, or alternatively, how to make the sand flow out faster.


This set up held their interest for weeks. There was so much more to sensory table play than just scooping, filling and pouring.

Sunday, August 25, 2019

Letting Them Learn For Themselves


I was visiting a preschool, and spending time with the children outside on the playground. An orange butterfly fluttered by, then landed on a small tree branch, just at the children’s eye level. Several children clustered around watching the butterfly as it first sat motionless on the branch, then fluttered to another branch, then settled on a yellow flower.

“What do you think the butterfly is doing?” I asked.

The children looked thoughtfully at the butterfly, then at me, then at their teacher.

“You know all about butterflies!” the teacher said, smiling. “Tell Shelli what you know about butterflies.”

One of the children broke into an excited smile. “Butterflies come from caterpillars. They’re caterpillars and the caterpillars turn into butterflies. There’s four stages. She held up her hand and  pointed to each finger as she spoke. “There’s an egg, then its a larvae and a pupa and then a butterfly.”

“And a larvae is another name for what?” prompted her teacher.

“A caterpillar!” the child exclaimed, beaming.

Meanwhile, the butterfly had flown away. And none of the children had answered the question “What do you think the butterfly is doing?” It was a simple question, one that each of them could have answered through their own observations, based on their own thoughts, conclusions, and ideas. But the opportunity to observe, evaluate, predict, and imagine was passed over in favor of reciting facts. Unfortunately, this is how science is so often taught – by teaching discrete pieces of knowledge or factoids for children to repeat back, or to represent in art projects where they carefully follow teacher’s directions to create a chart or diagram that shows what they “know” about butterflies, or trees, or the water cycle, or any other natural phenomenon.


Of course there’s room for teaching facts, even though many of those facts can wait until children are older, and have had the chance to first observe, predict, analyze and evaluate on their own. When we introduce facts, we’re taking away opportunities for children to develop their own ideas, because once you know the “right” answer, there’s no more room for your own theories. When we substitute teaching facts for observation, we’re teaching children to trust what they’ve been told, not what they see for themselves. The well intentioned teaching act of giving background knowledge also teaches them to trust other opinions, especially authority opinions, before considering their own. In a world filled with competing narratives and an ever-increasing difficulty in determining what is true and what is not, children need to develop critical thinking skills that they can use to process information, not only based on their trust of the source, but based on their own experiences, thoughts and observations. We need curriculum and schools that don’t just teach children to say the correct answer, but that give them an opportunity to discover why that answer is correct, and to evaluate any other possible answers as well.

One October in my 2-year-old classroom, we examined a pumpkin. I told the children we were going to cut it open, and asked what they thought would be inside. One of the children exclaimed, “A beautiful butterfly!” I didn’t tell him whether he was wrong or right. The only way to know for sure would be to open the pumpkin and see what was there for ourselves.


**Note: The butterfly anecdote described in this blog was not a verbatim exchange between me, a child, and teacher. This blog post is a composite of many similar conversations I’ve had with children, and that I’ve observed other teachers have with children, in which science “facts” replace personal experiences and reflections in conversation.

The pumpkin anecdote did happen as described. And much to the child’s disappointment, when we opened the pumpkin, a beautiful butterfly did not appear.

Sunday, February 11, 2018

Frozen Paint

During winter, sensory experiences involving things that are frozen or cold are a natural fit. When there’s snow, that can lead to days of exploration in the sensory table. And there are all sorts of other materials to freeze, including paint.

Freezing paint is easy – just fill small paper or plastic cups with tempera paint (Biocolor brand works well - http://amzn.to/2EztcKB), put in a craft stick (large ones work best), and put in the freezer. Even better, if the outdoor temperature is below freezing, put it outdoors in a safe place, to give the children the opportunity to observe what happens as paint freezes.

When I first started using frozen paint in my classroom, I thought of it mostly as an art activity. As the children move the paint popsicles across the paper, it leaves creamy, crayon-like marks. As the paint warms, it starts to melt into a thick gooey paint.


Over time, as I introduced this activity to different groups of children, I noticed that the children’s interest in frozen paint focused more on the sensory aspects than the art ones. The most interesting feature of the paint wasn’t how it looked on paper, but what happened when it melted. I started putting the paint out on trays, not just for easier clean up, but so children could fully experience the tactile sensations of moving the goopy paint around as it melted.


The paint swirled and layered on the paper, and began to soak through, transforming paint and paper alike. 


And before too long, the paint “popsicles” transformed and fell off their sticks, melting into the familiar texture of paint, to spread on paper with sticks and hands, or to simply enjoy the sensation and feeling of paint on fingers and hands.


“We are a participant in the Amazon Services LLC Associates Program, an affiliate advertising program designed to provide a means for us to earn fees by linking to Amazon.com and affiliated sites.” 


Sunday, December 3, 2017

Wet on Wet Painting


As the children become more familiar with the process of painting on paper, I introduce different textures and experiences. When it comes to exploration with art materials, color, and texture, the differences between “art” “sensory” and “science” activities are more related to teacher perceptions and categories than how children manipulate and experience the materials.

“Wet-on-Wet” painting involves painting with thinned paint on wet paper. I used watercolor paper, since it absorbs more liquid than construction paper. The paint was tempera with some extra water mixed in.

One child started with a hesitant stroke, then watched as the puddle of blue paint seemed to float above the already wet paper.


Another child stabbed at the paper with her brush, watching as waves of paint splattered out, and then splattered out again.


Soon, the wet, colorful surface gave invitation to touch, and to experience the sensation of water on hands, and to consider the differences in texture of a wet piece of paper and a wet table or tray.

Some children were drawn to use hands, others to use brushes, as paint and water floated, mixed, and swirled, each child choosing their own exploration and process.


Monday, May 29, 2017

Loose Parts in the Sensory Table

For the past few weeks, I’ve been writing about ways to introduce loose parts in the classroom 
with the idea that intentional planning of the environment can help the children structure their play in a way that is both open ended for children and manageable for adults.

One area of the classroom that lends itself to loose parts play is the sensory table. Very often, sand and water play focus on the simple tasks of filling and dumping. These skills are developmentally appropriate, especially for younger children, but are also self-limiting, because once the skills of filling and dumping are achieved, what’s next? The tools that children are given to fill and dump water and sand also sometimes interfere with their play. Buckets and shovels that are suitable for a sandbox take up too much space in the table, and children’s broad motions of scooping often fling sand and water onto other children and the floor, frustrating teachers and leading them to limit this play, or to wonder whether sensory table play is really worth it.

Adding loose parts (beads, shells, buttons, rocks, animals, etc.) to the material in the sensory table can open a whole new dimension of sensory play as children hunt for hidden objects, sort and classify, and pretend. Adding containers and scoops that are small enough to handle easily without taking up too much room or spilling on the floor can help make this area more manageable for adults.


Loose parts in sand lead to digging, hiding and searching, sorting, classifying, counting, and patterning. Combining different loose parts with containers that are different sizes and shapes encourages mathematical thinking and experimentation.


Adding an additional surface inside the table (a small shelf, or a hollow block or plank) gives children the work space to arrange objects and fully carry out their ideas.


Loose parts in water also lead to sorting, classifying, and counting, with the added opportunities to explore scientific properties like sinking and floating. Adding containers such as toy boats, cups, or plates give more objects to compare and experiment with.


Dark water (colored with black or blue liquid watercolor paint) is great to hide objects in and search for them.


Or, the sensory table can be filled only with loose parts – pom poms, rocks, shells, napkin rings, beads, etc. with small containers and scoops, spoons, or tongs for filling and dumping.


The magic of loose parts is providing children with that spark of imagination, creativity, and problem solving to think “what will I do with this?” How do buttons in the sand change the experience of playing with sand? How does filling a tube with sand and counting bears differ than filling a cup with sand and beads? As you add and change the tools for children to use with the sensory material, and encourage the children to add and change the tools as well, their thinking and their explorations change too.

Friday, June 10, 2016

Teaching Take Apart


Recently on a teacher discussion board I follow, some teachers were discussing the new trend of “take apart” or “tinkering” centers and how overwhelmed they felt trying to manage those activities in their classrooms. “Take apart” isn’t actually a new trend, but the current push toward emphasizing STEM (or STEAM or STREAM) activities has pushed the old tools and woodworking activities into the spotlight. The teachers on this board felt pushed to provide science and technology activities, but were struggling with how to do it in a child-directed play based way that ensured children’s safety. They were concerned about physical safety – children using tools like screwdrivers, wrenches, and wirecutters safely. But also about emotional safety – one of the common concerns mentioned was how easily the children got frustrated trying to take out screws or untangle wires. Several teachers said the activity ended with children hitting and banging the materials against the table, or smacking them with the screwdriver.

One of the things we sometimes forget in play-based curriculum, is that teachers are there to teach. We can follow children’s lead, and build curriculum around their ideas, but in our role as experienced adults, we can also provide the scaffolding and guidance they need to develop skills and to learn the steps needed to accomplish tasks independently. “Take apart” (or using tools) doesn’t involve a natural process like gravity or flotation that can be discovered through observation or trial and error. It involves a complex set of visual motor skills and use of human designed tools. Some children can figure some of these skills out independently, but some need scaffolding – adult guidance to help them complete the task successfully with as much independence as possible.

Before embarking on a take-apart project in my four-year-old room, I wanted to give the children an opportunity to explore and practice with the tools they would be using. I bought several different sizes of Phillips and flat-head screwdrivers, and a variety of large screws with wide heads. I put these out on a table with large pieces of Styrofoam, and inserted several of the screws into the Styrofoam. I showed the children the screwdrivers, and asked them if they could figure out how to screw and unscrew the screws.


Some of them had worked with screwdrivers before. Some hadn’t. One of the children noticed the difference between the flat head and Phillips head screws. I suggested they try both types of screwdrivers, and see if the same screwdriver worked on both screws. They figured out right away that they didn’t, but I wonder if they would have noticed this important difference if I hadn’t encouraged them to experiment.


 After a few days of working with screws and Styrofoam, with a teacher participating alongside them, it was time to move on to “take 
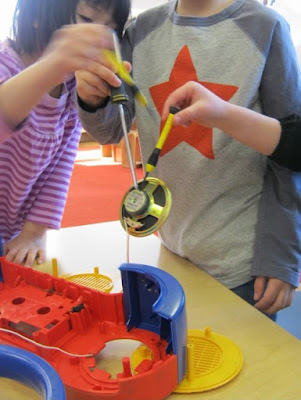
apart.” My co-teacher brought in an old cassette player, and we loosened the outside screws ahead of time, so the children would be able to unscrew them on their own. My co-teacher worked alongside them, to help hold the cassette player, or help turn a screw that they were having trouble with, and to simply manage the area, helping them to negotiate turns and to pass the materials around the table.


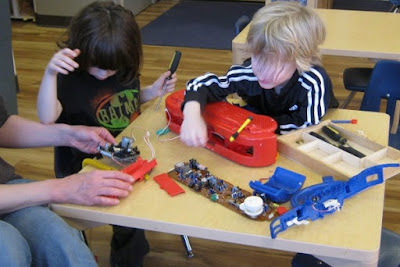
When they finally opened the case, figuring out what was inside wasn’t nearly as interesting to them as taking it all out.


The most interesting discovery about the contents was that the speaker was magnetic, and each child tested this by sticking their screwdriver to it. What a speaker is, and why it’s magnetic, wasn’t even a question – they were focused on the process of sticking metal pieces to the magnet


After everything was taken out, I asked if they thought they could put it back together. At that point, several of the take apart crew had left, because when you’re four, taking things apart is usually more interesting than putting it back together. But two of the children stayed with the project, and with my help, figured out how to close the cassette player case and fit the screws back in.


Did they figure this all out independently through play? No. Did they follow step by step directions and learn how cassette players work? No. But someplace in between completely child driven and completely adult led activity, they explored, they observed, they predicted, and they problem solved. Which is what science is all about – with our help.

Wednesday, May 11, 2016

Exploration Not Demonstration


For the past few years, there’s been a push to integrate science and technology into early childhood classrooms. But in play based programs, especially those based on Constructivist or Reggio philosophy, scientific exploration has been the core of the curriculum all along. Exploring, observing, questioning, predicting, and testing hypotheses – even if no one calls them “hypotheses” – has always been the essence of what children do when they play.

Still, the push to define play by traditional curricular areas can lead teachers to set aside times to “do science”, often in a way that’s simply a modified science experiment from older grades. Following directions to achieve a specific result isn’t scientific exploration. Watching as the teacher demonstrates a phenomenon isn’t scientific exploration. Even if each child has a turn to add one thing to a mixture, or to turn or press one button, that isn’t scientific exploration. Scientific exploration and logical, mathematical reasoning happen when the child is actively exploring an object, a material, or an idea. In play based programs, exploring, observing, questioning, predicting, and testing hypotheses – even if no one calls them “hypotheses” – has always been the essence of what children do when they play.

One of my favorite science explorations is baking soda and vinegar. Not by “making a volcano”, where children watch in anticipation for the reaction they’ve been told to expect (which isn’t actually a “volcano”, since the physics of lava is very different from the chemistry of baking soda and vinegar). Instead, my goal is for the children to explore the materials and figure out what will happen when they mix baking soda and vinegar together.

I set up the activity for my four-year-olds with bowls of baking soda, small spoons and trays. They filled the trays and instantly noted the similarities between the unnamed “powder” and flour.


When the trays were filled, I put out bowls of vinegar with eyedroppers. I had colored the vinegar with liquid watercolor to make it more visible and easier for the children to observe what happened as they mixed.


Initially, the main interest was using the eyedroppers to mix the colored liquid – or “bubble water”, as one of the children called it. They were so focused on the color mixing, they didn’t notice right away when some of the vinegar touched the baking soda.


But once they noticed that someone had made something happen, their goal became to figure out what happened and make it happen again.


The children used the droppers to move vinegar into the baking soda, and then used spoons to move the baking soda into the vinegar – each time observing the reaction that took place, and when the bubbles subsided, exploring the texture of the wet baking soda and wondering what other things they could mix together. This was science – and was much more meaningful and engaging than a demonstration led by a teacher.


Thursday, April 7, 2016

Texture Brushes


A new material I’ve introduced to my two and three-year old class is texture brushes. I’m sometimes skeptical of the art activities that involve painting with different objects. Paint brushes are designed the way they are for a reason, to be able to control the movement of the painting tool to make marks on paper. If the goal is to make carefully controlled or deliberate markings, paintbrushes or something similar are perfect tools. But if the goal is to experiment with different ways of getting paint onto paper, and to explore the physics of how texture, size, and movement impact the painting process, then using a variety of materials is a great scientific exploration.

I always consider these questions when choosing painting tools:

Can children physically manipulate and control the tool?

Is it sturdy enough to withstand pressure, bending, and physical force?

Will it hold the right amount of paint for children to be successful?

And, for children under 3: Is it clearly something that should be used for painting?

This last question might seem contradictory, if the purpose is to paint with objects not specifically intended for painting. But very young children have trouble distinguishing between using the same object in different contexts. A toddler might not understand that an apple dipped in paint isn’t an apple for eating. And a two-year-old might not understand why they can dip the toy animals in paint today but not tomorrow, or why they can paint with toy animals but not with other toys they pull off the classroom shelves on their own. 

There’s also the sensory component of painting. Brushes have their own textures and tactile sensations, whether the brush is moving across the palm of your hand, or you’re feeling the sensory input from pushing the brush against paper. Different objects in paint each have their own sensory and tactile components too.I decided to make my own texture brushes – each one was a different material taped to a large craft stick. I choose waterproof materials that could be washed and reused: heavy duty shelf liner, bubble wrap, and fabric from a mesh bath sponge. I cut a strip of fabric from each material, and taped it around the stick. First I used masking tape, but realized that wouldn’t be strong enough, so I added a layer of duct tape as well. Plastic spoons would also work as handles instead of craft sticks and would be more waterproof.


I made four sets, each with the three different brushes. I set up the activity as individual stations, each with three colors of paint and three different brushes.


The painting was much less deliberate and intentional than brushes as the focus shifted to the physical properties of the materials: how they felt, how they moved across the paper and across skin. I wouldn’t think of this as an “art” activity as much as a “sensory” or “science” activity that happened to use paint as the medium for exploration.