Pages

Wednesday, January 27, 2016

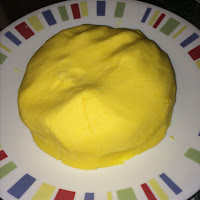
Gluten Free Playdough

One of the basic staples in my classroom is playdough. I almost always have playdough, or a similar material available daily. I use a homemade cooked playdough recipe (more about that here), that’s flour based. One the downsides of homemade and many store bought playdoughs is that because of the flour, children who are gluten free or have a wheat allergy can’t use it, and in an allergen aware classroom, it might not be allowed.

So I tried out some different dough recipes that didn’t use flour. Many of them made different goop concoctions, which can be rich sensory activities, but they don’t have the same properties as playdough. Finally I found this one – a cooked recipe of cornstarch and baking soda. Even if you don’t have any restrictions that keep you from using a flour based dough, it’s nice to provide the children with materials that have various textures. This dough is slightly softer than traditional flour-based playdough, and feels cooler to the touch (similar to cornstarch goop), but holds up just as well during play and has a similar shelf life.

Here’s the recipe:
1 cup cornstarch
2 cups baking soda
1-1/4 cups cold water
1 tablespoon vegetable oil
1 tablespoon food coloring
  
Mix all ingredients together over low heat until the dry ingredients all dissolve.


 Keep stirring for about 5 minutes until it starts to bubble.


Once it bubbles, it will start to thicken slowly. Keep stirring for another 2 or 3 minutes.

If you’ve ever made cornstarch goop, the mixture will have the same properties as it cooks, looking solid, then turning liquid when you try to pick it up.

Soon it will start to solidify. It will look like mashed potatoes or grits.


 When it turns solid and starts forming a ball, take it off the heat and let it cool. Store in a sealed container.

 Gluten free playdough


Sunday, January 24, 2016

A Table in the Sand Table - Part 2

A few weeks ago, I wrote about putting "a table in the sand table" – creating a work surface that children could use to pile sand, arrange loose parts, and manipulate objects closer to their eye level. The pegboard had many interesting properties, but one problem. In some ways, it was too big for the table. It was difficult for children to reach under and around, and there wasn’t much space for children who wanted to dig and pour the sand without the table being in their way.

I decided to try a different type of surface – a long flat piece that would go across the middle of the table. Ideally I would have like to use wood, but with my limitations on time and material, I chose cardboard. I cut a long strip out of a cardboard box, and cut three large rectangles across the surface. Part of the children’s explorations with the pegboard “table” involved pouring sand through and pushing objects underneath. I wondered what they would do with larger holes that hands and objects could fit through.

I secured the cardboard strip to the sensory table with duct tape at the ends, and used masking tape to tape together two stacks of unit blocks to serve as supports in the middle. I taped down the cardboard to these supports to hold it in place.


Initially, the children’s main interest was the holes. Pouring sand through, dropping objects through, and sticking their hands through


One child said he didn’t want any holes, and asked me to cover them up. I gave him some pieces of cardboard, and he covered each hole, to create a solid surface. This added a new dimension to the play, which quickly shifted to piling sand on top of the cardboard slats, then pulling them away to watch the sand fall through the holes.


The cardboard strip and slats became not only a work surface, but a place for physics exploration, covering up holes, creating ramps, and balancing objects.


Sunday, January 17, 2016

"I'm Doing Mixed Up Colors"

My class has been exploring the different textures of painting tools: brushes of different thickness and shapes, sponges, balls, and most recently, small round sponges on the ends of sticks. The actual name of these is "sponge stippler" (as I discovered after a long internet search), and they provided a novel textural experience than the other tools, The small size was easy for the children to control, and the sponge held just enough paint to glide across the paper, but not so much that it dripped.

One of the physical properties of sponge painting is the way that colors mix together, which became the main focus of the children's attention.


"I'm doing mixed up colors."
"Look I'm putting red to yellow."
"And blue to red."
"What's that kind of color?"
"It changes yellow to red."


I've written before about teachers watching and not talking as children work. The discovery process in this painting project wasn't about discovering what would happen when the colors mixed together. It was about the experience in the moment of combining colors, of swirling one over the other and letting the children create and observe change as it happened. "I'm putting red to yellow" isn't about making orange: it is, as another child said, "I'm doing mixed up colors."

As a teacher it's sometimes hard to just sit and watch the "doing". One of the children began her painting by using the sponges as stamps, making large dots all over her paper, and then carefully tracing them with more paint. But then, she moved her sponge in broad strokes, obliterating the circles, layer after layer. To make more circles, and sponge over them again. It's sometimes hard to watch the process of creation upon creation, of mixing upon mixing, and just let it happen without questions or comments, or interruptions to the flow. But I'm not the one in charge of the "doing". The "doing mixed up colors" belongs to the child.


Tuesday, January 12, 2016

A Table in the Sand Table

One of the things I’ve always wondered about sensory table design is why there isn’t usually a convenient work area for children to place and arrange materials. Sensory tables are designed as deep receptacles where sand, water, and similar substances can be moved about without spilling over, but there isn’t any easy place to put a filled container on a solid surface to fill it, or to assemble a group of objects that you’re working on.

To solve this problem, I sometimes put a wire closet storage shelf inside the table, providing a convenient surface for children to set their cups and scoops on. And sometimes, the holes in the mesh provide another medium to experiment with, as children pour sand or drop objects through the holes.


After watching the children pour sand over and through the large square holes, I decided to attach a pegboard to the wire shelf, to see if they would be interested in experimenting with how sand pours through those smaller holes. I used a clear sheet of plastic drilled with rows of pencil size holes.


Some of the children noticed the movement of the sand through the holes, but for most of them, the pegboard was just another table. Some were interested in the texture of the surface, and the sound made by pushing the sand across the plastic. The next day I added paintbrushes to the sand, and the children swept and brushed the sand in swirls across the pegboard. But what interested them most was laying objects on the pegboard, and using it as a table, or as a palette or staging ground for their ideas.


Maybe it was the solid surface that held objects up so much better than loose sand does. Or maybe it was the visual perspective of being able to arrange and manipulate objects so much closer to their eyes and line of sight than deep in the bin of the sensory table. Whatever the reason, the table-in-a-table gave some extra scaffolding and support, both literally and psychologically.